![]() Cross-platform transfer solution for all smartphone users to transfer content between Android and iOS, transfer data from iTunes, iCloud, iTunes library to mobile phone.
Cross-platform transfer solution for all smartphone users to transfer content between Android and iOS, transfer data from iTunes, iCloud, iTunes library to mobile phone.
How to Convert HEIC Photos to JPG on iPhone
Now when you take a photo with iPhone 7 or later models, you will get a high-quality picture (HEIC) just as before but only at half the file size, which can help you save space. However, since HEIC is a new container format, you may meet incompatibilities when you want to check your iPhone photos on computer.
Here we will show you four effective ways to convert HEIC photos to JPG on iPhone.
 Way 1. Convert HEIC Photos to JPG on iPhone
You may find yourself unable to view the HEIC photos on your computer. If you want to transfer any kind of photos, in HEIC or any other format, then you should give PanFone Manager a try. This is a third-party mobile phone manager that gives you a lot of freedom. It will convert and export your HEIC images from the iPhone to the computer in HEIC and JPG format. What's more, it also enables you to transfer other contents like contacts, text messages, call logs, music, videos, apps and more from iPhone to computer.
![]() PanFone Manager
PanFone Manager
PanFone Manager is a reliable phone data management tool that enables you to manage, transfer and back up data like videos, SMS, music, photos, contacts, audios, and more.
- Easily transfer music, photos, videos and more between iOS/Android devices and computer.
- Back up all the important mobile phone data on PC avoiding loss of data.
- Restore the backup files to your mobile phone with one click.
- Organize and manage your photos with customized filters.
Download Free Mobile Phone Manager:

Three Steps to Export HEIC Photos from iPhone as JPG Photos
Step 1 : Download and install this Free Mobile Phone Manager on your computer.
Step 2 : Run this program and connect your iPhone to the computer with a USB cable and PanFone would recognize your device soon.

Step 3 : Select photos or albums you need to transfer to your computer.
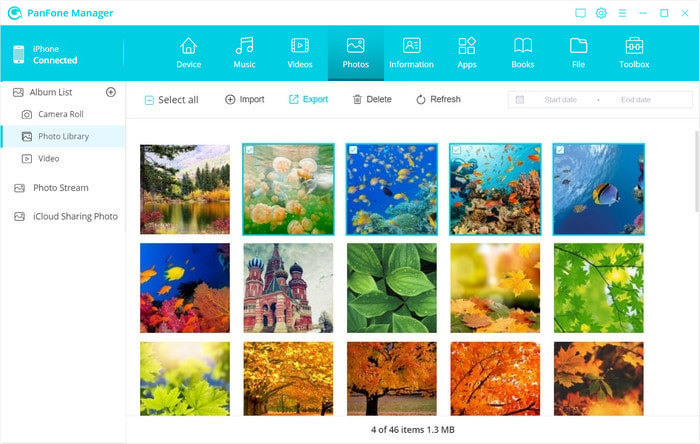
After your iPhone is detected successfully, navigate to the Photos tab on the top menu bar. All albums will be displayed on the main window. Simply double-click a certain album and then you can view all photos in this album. Just select the multiple Heic photos you need and click on the Export button. PanFone will automatically convert your HEIC photo(s) to JPG photo(s) and also export the original HEIC photo(s) for you.

 Way 2. Save iPhone Photos in JPEG Format Instead of HEIC
To switch from HEIC to JPEG, you can simply turn off the high efficiency on iPhone. Just follow the steps below:
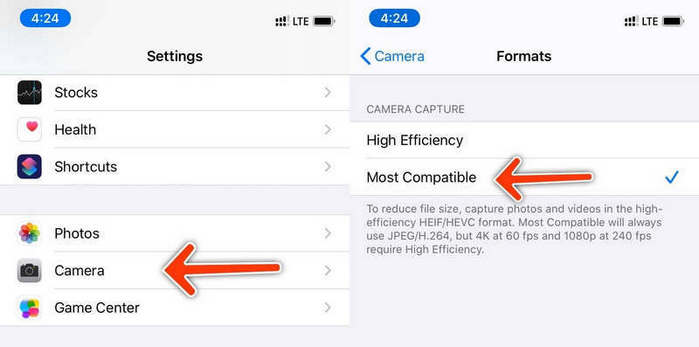
Step 1 : Open the Settings app on the iPhone.
Step 2 : Scroll down to Camera and tap on it.
Step 3 : From the following menu, tap on the Formats option.
Step 4: You will find two options in the Camera Capture menu – High Efficiency and Most Compatible. The former captures the photos in HEIC format while the Most Compatible option saves photos in JPEG format. Tap "Most Compatible".

From now on, the iPhone camera will capture the images in JPEG format. It will also change the video format as well.
 Way 3. Convert HEIC to JPG Using Email
Another easy way you can try to convert iPhone HEIC images to JPEG is to email the HEIC image to yourself from iPhone, and it will change HEIC to JPEG format automatically. After that, you can download HEIC images on your PC or Mac by accessing your email account.
Note: It's more complicated. You need to download one by one. Lots of users complain that they cannot receive the email for some unknown reasons.
 Way 4. Turn on Automatic Transfer on iPhone
If you want your HEIC photos to just automatically convert to JPG when you transfer them to your computer or some other device, you do not have to use a HEIC to JPG converter.
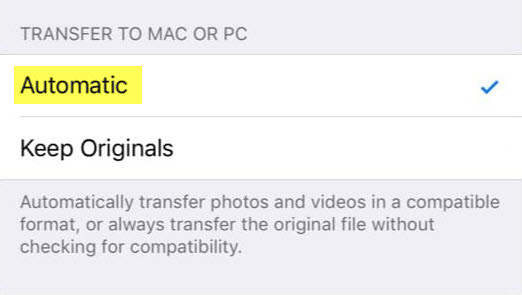
Step 1 : On your iPhone, simply go to Settings > Camera > Formats > Choose Automatic under TRANSFER TO MAC OR PC.
Step 2 : Choose “Automatic” instead of “Keep Original”. Then the HEIC photos will convert to JPG automatically while showing on Mac or transferring to Windows computer.

That’s all for how to change iPhone photos from HEIC to JPG. PanFone Manager is highly recommended. It helps you to export HEIC photos to JPG photos and also keep your original HEIC photos. Why not download it and have a try?